Development Workflow
Running a Project
To run a NativeScript app, you need a device — either a physical or virtual.
Running a project
To run a project, use the ns run command. There's also a ns debug command covered in the debugging documentation.
ns run android
ns run ios
The run command runs the app on all connected devices matching the platform. You can control which devices to run on with the following flags:
--simulator, --emulator
These flags are identical. Using them runs the project only on virtual devices.
--device <id>
Only run on the specified device. The id is taken from the output of ns devices.
--clean
Forces a clean rebuild of the native application.
Running on physical devices
You can develop on physical devices:
- Through USB by enabling USB Debugging on Android Devices or preparing an iOS device for development
- Wirelessly by following these guides:
Enable USB Debugging on Android devices
1. Activate the Developer options menu and enable USB debugging
Go to Settings › About phone › Software info and then tap Build number at least 7 times until a message pops up saying "You are now a developer".
Next, go to Settings › System › Developer options and enable USB debugging.
2. Plug in your device via USB and verify it's detected
Plug in your device via USB and check that it is correctly being detected by ADB:
adb devicesTo verify NativeScript can also detect the device, run:
ns devices androidYour device should appear in both lists.
Troubleshooting
If any of the above failed, we recommend checking out the Android ADB documentation, or asking in our Community Discord for assistance.
Preparing an iOS device for development
Before the NativeScript CLI can run apps on a physical iOS device, the device must be set up and registered.
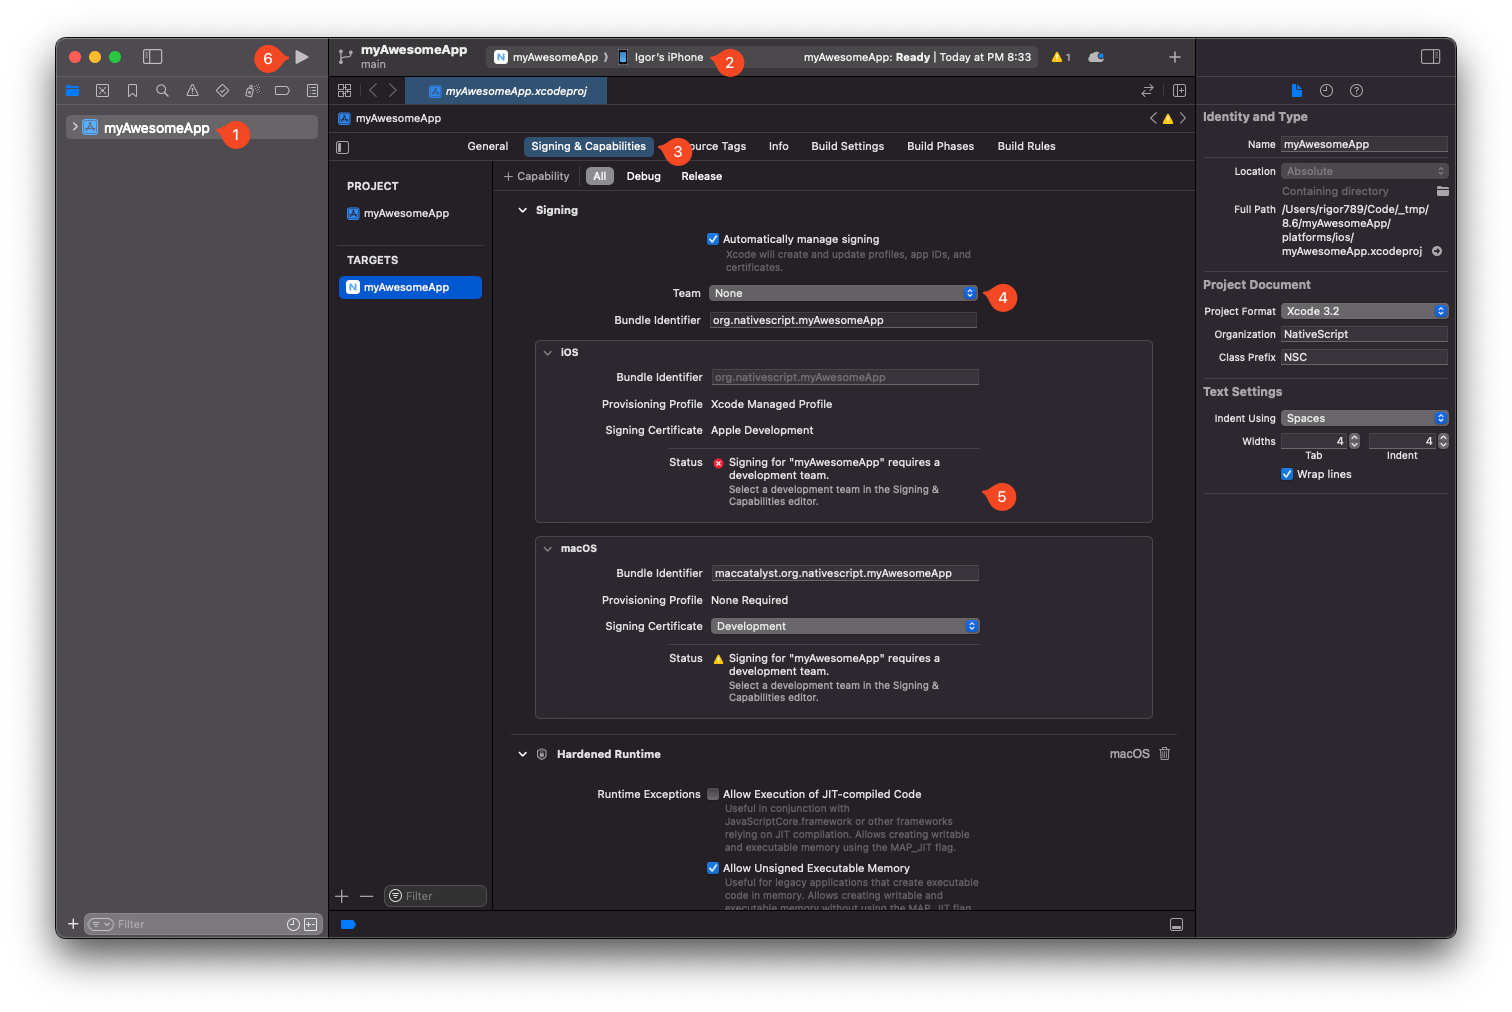
Use a USB cable to connect the device. Navigate to the platforms/ios folder in your project, then open the .xcworkspace file in Xcode.
Note
If the platforms/ios folder doesn't exist, run ns prepare to scaffold it.
If there's no .xcworkspace file, you can open the .xcodeproj file instead.

- Select the app target from the sidebar
- Select the target device
- Go to
Signing & Capabilities - Select a team (Create an Apple developer account if you don't have one yet)
- If this is your first time running an app on your iOS device, you may need to register your device for development by clicking the
Register Devicebutton that shows up here - To verify you are able to run on the device, run the app once from within Xcode
Once the app successfully runs from Xcode, you can close it and continue using the NativeScript cli:
ns run iosThe app should install and launch on the connected iOS device.
Connecting an iOS device over Wi-Fi
Once the device has been prepared for development, keep the device plugged in, open Xcode Window › Devices and Simulators, select your device from the left sidebar and tick the Connect via network checkbox.
After disconnecting the cable, the device should remain visible in ns devices and running the app should work as normal:
ns run iosThe app should install and launch on the iOS device.
Note
Xcode network devices sometimes get disconnected or have an unreliable connection. We recommend using a wired connection to avoid these occasional issues.
Running on virtual devices
Android Emulators
Creating Android Virtual Device via Android Studio
Open Android Studio, and then open AVD Manager from the Tools › AVD Manager menu (Configure › AVD Manager dropdown on the Welcome Screen).
- Click Create Virtual Device...
- Pick a device from the list, for example Pixel 3 XL
- Click Next, then select a system image. For most users we recommend picking the latest API Level from the Recommended tab (press download if the selection is greyed out).
- Click Next and leave everyting on default (feel free to customize/experiment with different settings).
- Click Finish to create the AVD, which should now show up in the AVD Manager list.
To start the newly created AVD, press the green play button next to it.
Creating Android Virtual Device via command line
You can use avdmanager to create Android virtual devices. To get started, read the official Android documenation about using avdmanager.
Third-party Android Emulators
NativeScript works with most third-party Android emulators like GenyMotion. For usage instructions, please refer to their documentation.
iOS Simulators
Creating iOS Simulators
To create additional iOS simulators, follow the official Apple documentation about adding additional Simulators
Running on iOS Simualators
Running ns run ios will launch the default Simulator (if there are no physical devices, or already running Simulators available). To switch to a different Simulator, go to File › Open Simulator and select a Simulator to run.
- Previous
- CLI Basics
- Next
- Debugging

